Custom audience is an information list or database of email ids, phone numbers or website visitors audience who have already interacted with you or vice versa. By targeting your ads to a specific set of audience, you are increasing the effectiveness of your Ad.
For example: I just visited so and so website and so and so ad has popped up! Interesting no? In a way, we call it Haunting Advertisements
6 Reasons Why is Custom Audience Important?
- Custom Audience helps in brand recall.
- become all the more easier with this process.
- Understand user behavior on the website and create customized ad campaigns according to their behavior.
- Develop relationship with existing customers by uploading their email ids and phone numbers and exclusively targeting them.
- When a Facebook pixel code for custom audience is integrated with the website, the Audience Insights and demographics of your website visitors can be tracked using Facebook Audience Insights. (This helps you fetch some data beyong what google analytics give for example: marital status, educational level etc)
- Custom Audience can be built using website visitors, phone numbers, email ids and mail chimp account subscribers.
What do you require?
To create a custom audience, you need an existing database to whom you want to target your Ads. On Facebook, you can upload a database consisting of email addresses, phone numbers, mobile advertiser IDs or Facebook user IDs (from mobile apps only). Please note that there must be atleast a minimum number of 20 people in your database for it to be considered as custom audience.
Save the database you have in an excel sheet as CSV (comma delimited) form and keep it at the ready to upload when you are running the Ads. Once your custom audience list is ready, you may go ahead and access the Ads dashboard for uploading your data on your Facebook ads account
Step by Step process
Step 1: a) Accessing custom audience updation page for first time Ad users
If you are new to Ads manager and are running your Ads for the first time, you will be taken to the below screen.
Click on any one of the objectives based on the aim of your Ad campaign. In this blog post, we have taken Promote your page just as an example.
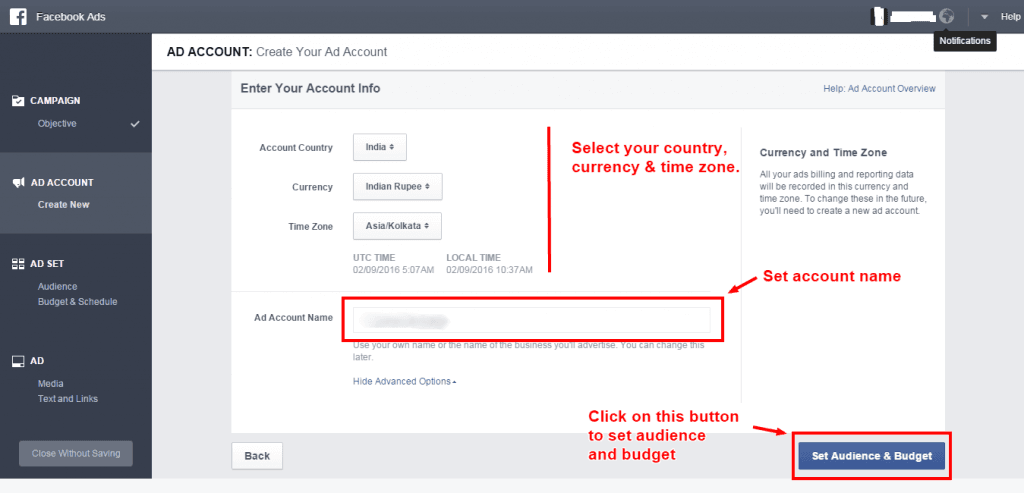
After selecting your objective, choose your page and click on the “Create Ad Account” button to proceed. You will be then directed to a page where you begin to create your Ad account. Select the country, the currency and the time zone from which you will be executing your Ads. Choose wisely as once you set these parameters, you will not be able to change it. Give a name to your Ad account for easy reference. You can either give your name or the name of your brand. Once done, click on the “Set Audience & Budget.”
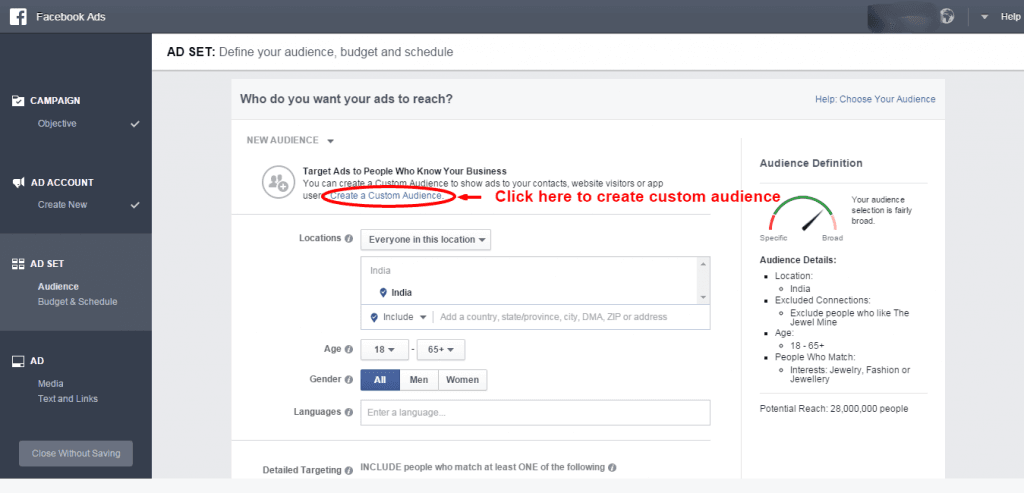
Upon clicking the Set Audience & Budget button you will be taken into the Ad Set page where you will see the option for uploading your custom audience. Click on “Create A Custom Audience.”
Following which you shall be directed to the following page with the pop up to upload your custom audience.
Once inside the dashboard, click the account you wish to execute your Ads with.
b) Accessing custom audience updation page for existing Ad account Users:
Type out the URL www.facebook.com/ads/manage to go to your ads account. Once inside the dashboard, click the account you wish to execute your Ads with.
This will lead you to the Ads dashboard where you start the process of uploading your database.
Step 2: Click the Tools button and you will see a drop down appear. Click on Audiences. Once you are navigated to the next screen, click on ‘Create Audience’ at the left corner of the screen. Select ‘Custom Audience’ in from the dropdown.

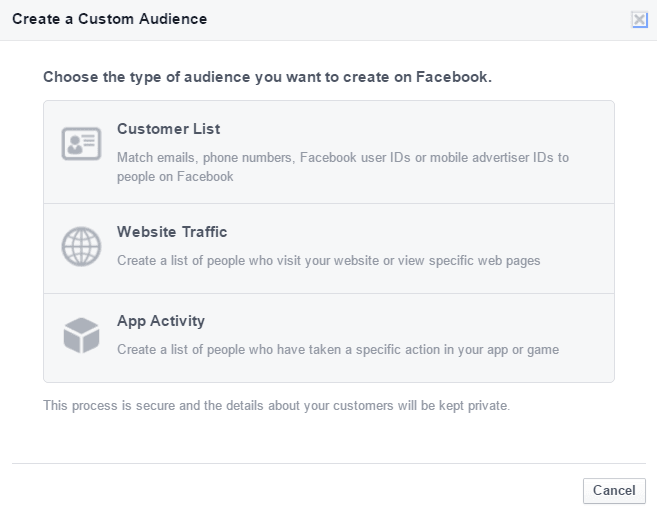
Step 3: Once clicking on the custom audience, you see a pop up which prompts you on the kind of audience data you want to upload.
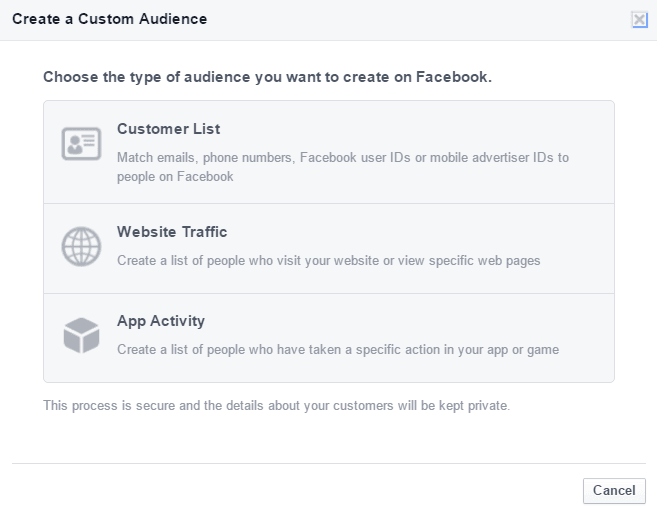
There are three options for the same as briefly mentioned in the beginning. They are listed below for your understanding:
- Customer List: emails, phone numbers, FB Ids or mobile advertiser Ids on Facebook.
- Website Traffic: You can create a list of people who visit your website or specific pages of your website.
- App Activity: You can create a list of people who have taken a certain specific activity on your App or game.
Process 1: Customer List
Once you click on customer list, you shall be given three options – Uploading a document, copy pasting the data or upload via mail chimp. Go ahead and upload your data according to your necessity.
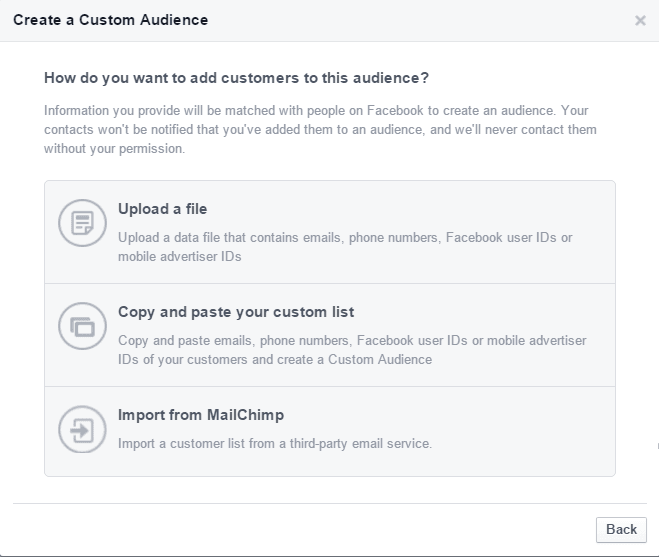
i.Upload a document: Once you click on uploading a file, you are directed to a pop up where you can upload your data. Choose what data you are feeding from the ‘Data Type’ drop down.
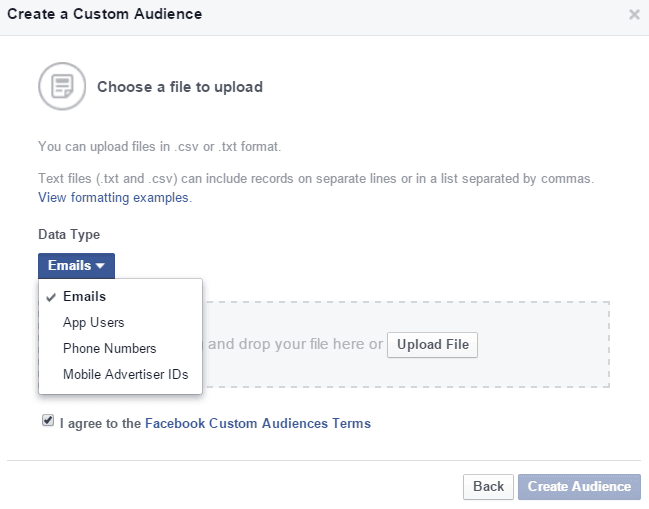
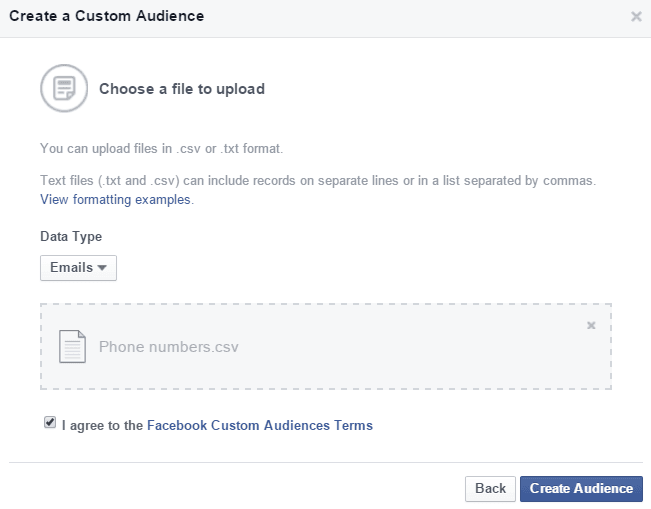
Once you choose your nature of database, upload your file on the space given and click on ‘Create Audience’
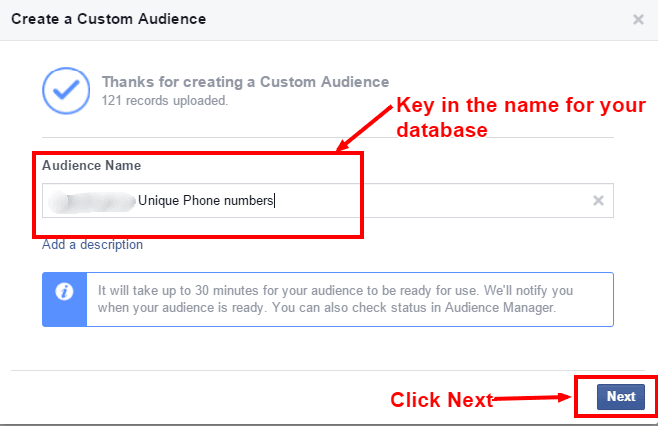
Name your audience – use name that is easy to remember. Click on Next.
Click on ‘Done’ to create your audience.
ii.Copy and Paste your custom list
You can also copy and paste your database onto the Ads manager to create your custom list. Once you click on custom audience and you see the pop-up, click the Copy and paste your custom list.

Copy and paste your database be it phone numbers or mail ids. Check the box agreeing to the terms and conditions of Custom Audiences Terms. Once done, click on create audience.

Name your audience and continue as in the previous Process.
iii.Import from Mail Chimp

If you have a mail chimp account from which you need to extract data, click on the ‘Import from MailChimp’ option. You will be directed to a pop requesting you to login to mail chimp. Click that to login and upload your database.
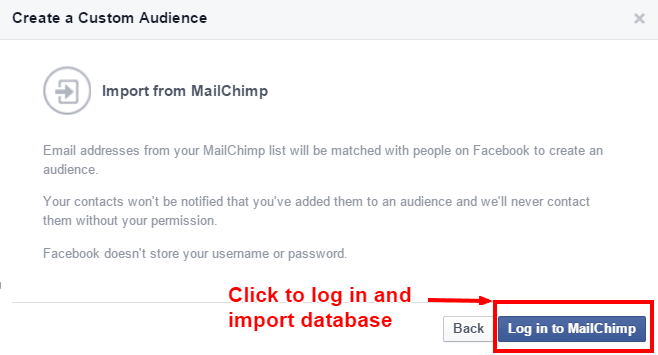
Process 2: Website Traffic
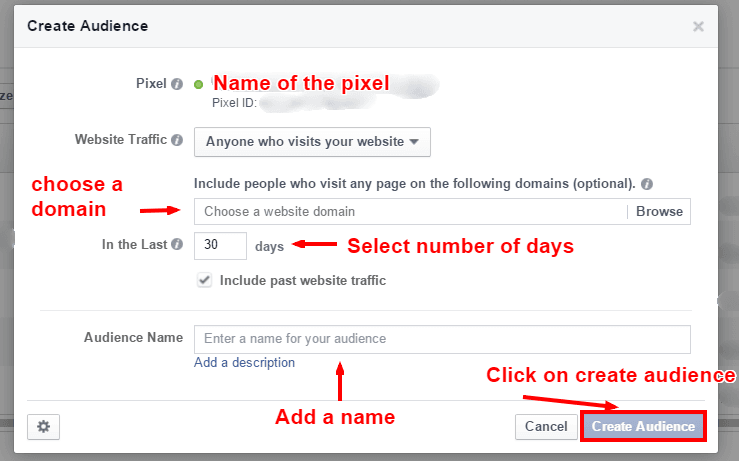
With custom audience, you can make a list of people visiting your website or even specific pages on your website. Once you click on Create Audience, a dialog box pops up with the three options as you can see below.

Click on Website Traffic and you will be directed to another page. Choose the page you want to select the audience from by clicking on the drop down option given for Website Traffic.

Once you select the page you want to use for targeting, move to fill in the next fields.
If you want to include people who visit any page on particular domain, you can add that here as well. Choose the number of from which you want the visitors to be included, add a name for your audience and go ahead and click on Create Audience.
Process 3: App activity
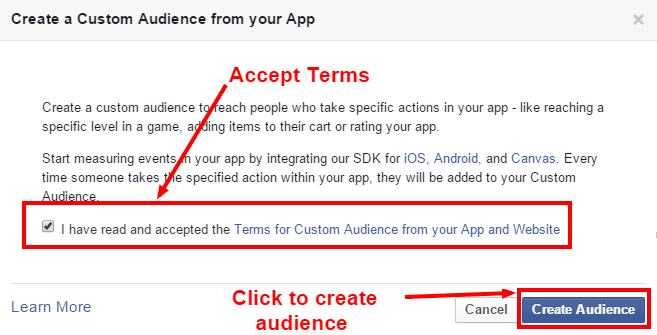
By creating a custom audience using your app activity, you can make a list of people that perform certain activities on your App. For example, reaching a particular level or visiting a certain tab.
Once you click on App activity, accept the terms for creating custom audience and click ‘Create audience.’
So here are the ways in which you can create custom audience and optimize your reach. Do try it out and let us know how it worked for you!
Do’s and Don’t of Building Custom Audience:
Put some 6 to 10 pointers such as don’t over target people, don’t use same ad copies, don’t hold the audience for more than 3 products if it is a dynamic product, display content that works a drawing mechanism etc. How can you make your custom audience more effective? Here are a few tips:
- Do not over target people – While it is good to remind people that they still have a chance to buy the shirt or shoe they had liked, it will also get annoying for your audience.
- Customize your messages – Custom audiences are one step ahead of fresh audience who will see your Ads. They have already checked out what you have to offer and thus considered purchasing your product/ services. You may even say they are primed to buy what you have to offer. Hence, it is only fitting that you customize your messages to your audience.
- Do not hold your audience for more than 3 products – This is for all retailers out there who have many products to showcase in order to pull in their audience. Followers these days get bored if they are bombarded with the same sight for more than 3 products. Instead, you can decide how many times you can target your products to your audience.
- Keep your copies consistent – Since custom audience already have an idea about your offering, the copy of your Ads must be in continuation with what they have already seen. Few examples can be: Buy now before it gets sold out! Get them while they are still in stock! Or Don’t wait anymore!
- Don’t use the same Ads as the regular Ads – Treat your custom audience to something extra. After all, they have already expressed their interest in your product/services. Go creative! Treat them to catchy, funny and even cheeky messages urging them to make the purchase.
This article was contributed by Malavika – Social Media Manager at echoVME under the guidance of Sorav Jain.


