Up until now, when running a lead generation Ad – the receiver of your Ad aka your target market would usually be directed to a website. Which means leaving the Facebook page. Ever thought that this itself might be hindering the effectiveness of your ads? Dicey situation isn’t it? Enter the new and improved Lead Generation Ads from Facebook! With this, you can now collect information from your target audience without moving them to a specific landing page and collect quick data. All you have to do is log in to Power Editor and create your advert.
Pros and Cons of Lead Generation Advertisements on Facebook:
Let’s start with Pros First:
- You don’t need a landing page as the one click ad fetches data directly from the Facebook’s database with the consent of the consumer who has clicked on the advertisements and then passes it on to you (its best to have a landing page with detailed overview so that they be mentally prepared for further communication from you)
- It requires just one ad copy! However, it is suggestive of creating different advert sets for A/B split testing.
- You have multiple options to pick in the form, platform allows you to create your form with five data points. We usually prefer: Name, Phone, Email, Designation and City.
- Cost per Lead is not very expensive (Based on the campaigns compared to conversion or Google Advertisements)
- Mobile Internet users are usually higher than Desktop users – This will help brands fetch data / larger audience base.
- With tools like connectleads.io and leadsbridge.com – the entire process of marketing can be automated from the time someone clicks the call to action button.
Cons:
- Facebook should activate desktop and right hand side version of these advertisements.
- The data has to be manually downloaded everytime from the Form library and then that needs to be fetched
Step by Step Process on How to Go About Facebook Lead Generation Ads
How to create a lead generation ad?
Step 1: Lead generation ads are created using Power editor on Ads Manager and Power Editor only opens on Google Chrome. So you need to have Google Chrome Browser in order to access to power editor Log on to your Facebook account click on Manage Ads. Click on Power Editor; download your advertisement account to get started.

Step 2: Once you are on Power Editor, click on the “Create Campaign” button.

Step 3: Once you click the create campaign button, you will be asked to choose a campaign. If it’s a new campaign go ahead and give it a name. Once that is done, you will be presented with the objectives for which you can run ads on power editor. Select Lead generation and click the Create button.
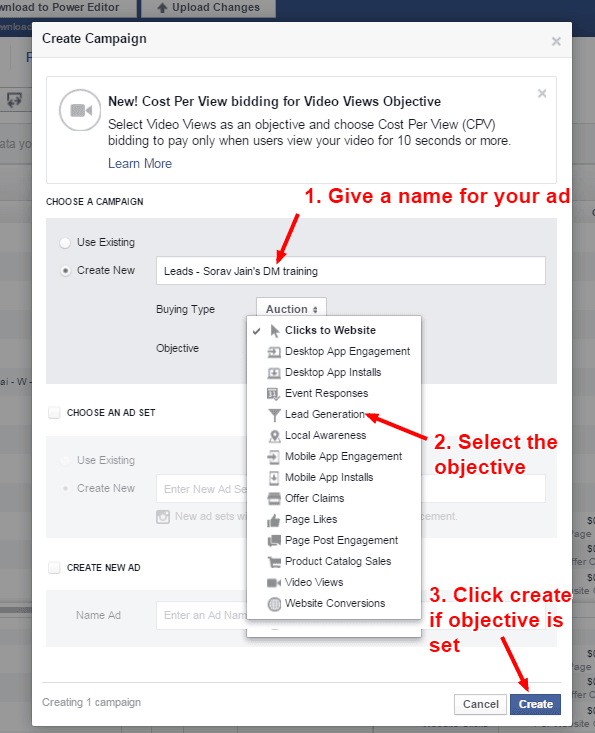
Step 4: After selecting the Facebook advertisement objective for campaign you can go ahead with the normal Ad creation process. This includes – setting the Ad budget, picking the target audience based on location, interests, age and other choices and setting up a call to action button.
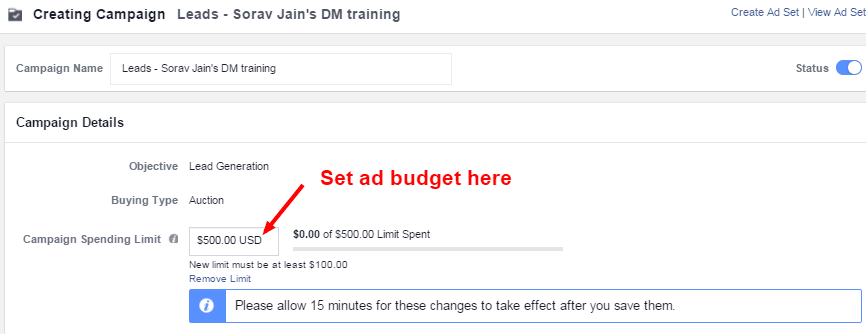
Set the spending limit before you go on to choose your preferred method of bidding for the Ads you are running.
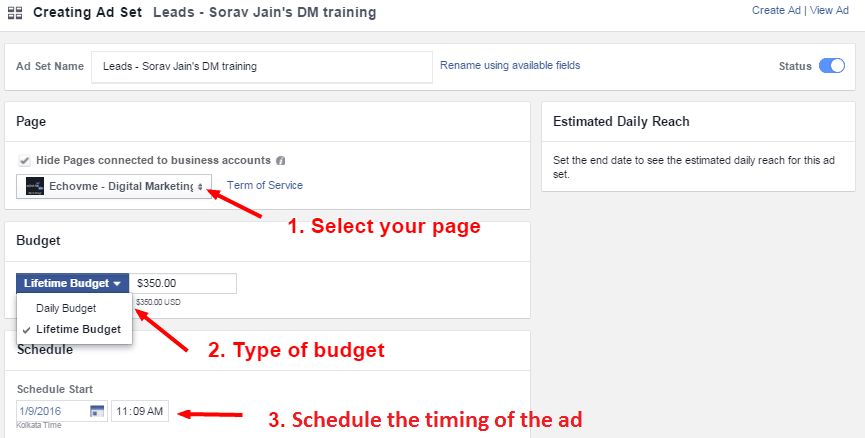
Select the page for which you are running your Ad, the kind of budget you want to go for – Lifetime or Daily budget before you move on to select your audience.
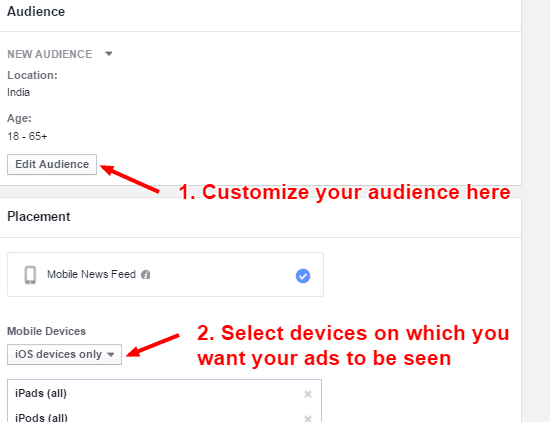
Customise your audience if you want to and then move on to selecting the devices on which you want your ads to run. Facebook gives you the freedom of choosing from a varied number of devices on which you can run your Ads. Choose the ones you think your audience might use. Optimize your Ads to set an objective on how you will be charged.
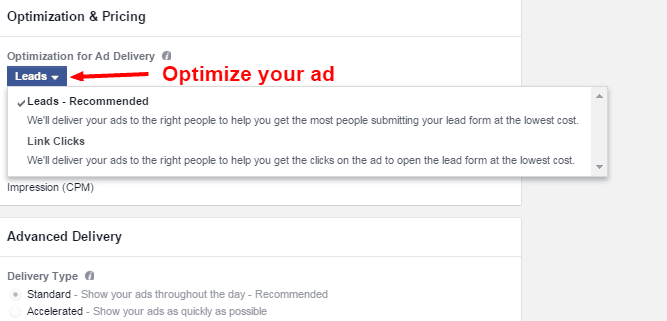
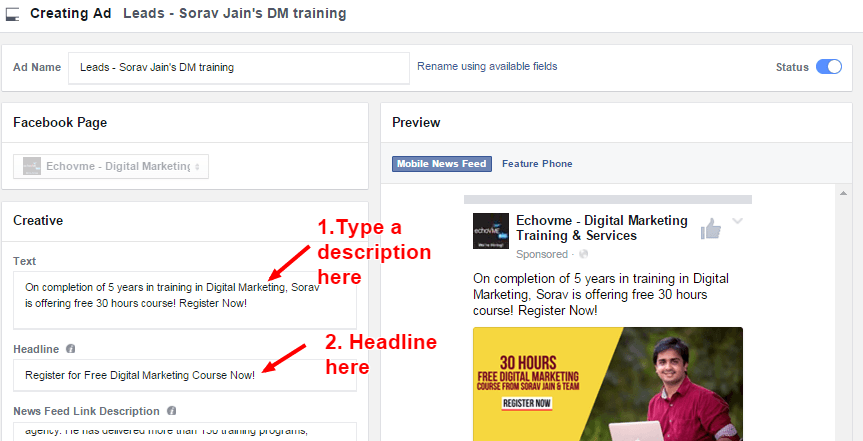
Once you have optimized your blog, go ahead and key in your description and headline. Keep it short and informative. Avoid fancy words.

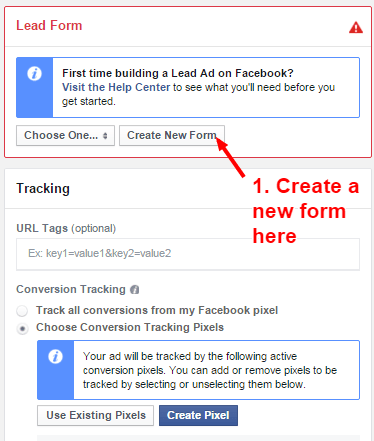
Step 5: For a new campaign you will have a lead form section. Click on create new form and move ahead with filling up the form.
The form has three steps to create a new lead generation Ad:
First step: Give a name to your form. And then click next once you are done naming.
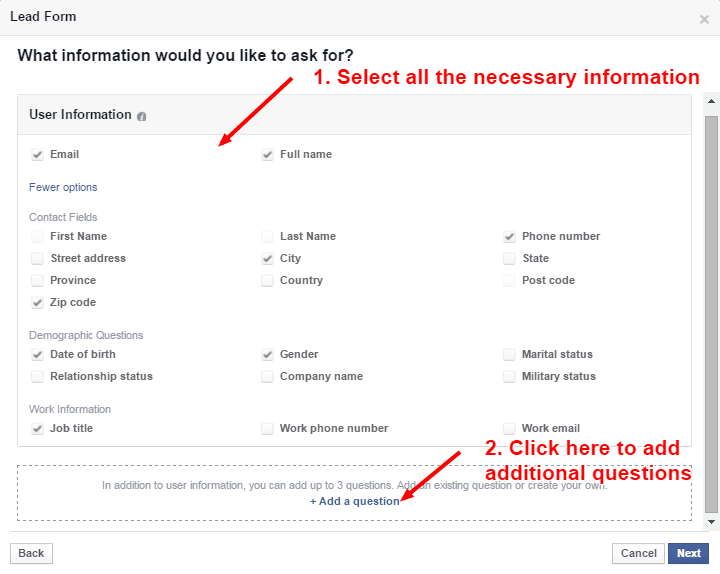
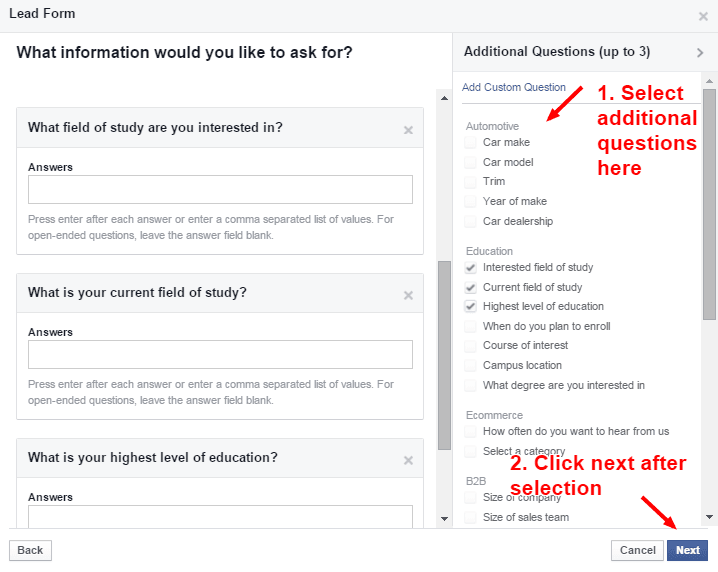
Second Step: Tick all the check boxes related to information you would like to receive from your customer. Once you are done at the bottom you have an additional option of adding three more questions of your choice that you would ask your customers. Click next once you are done.
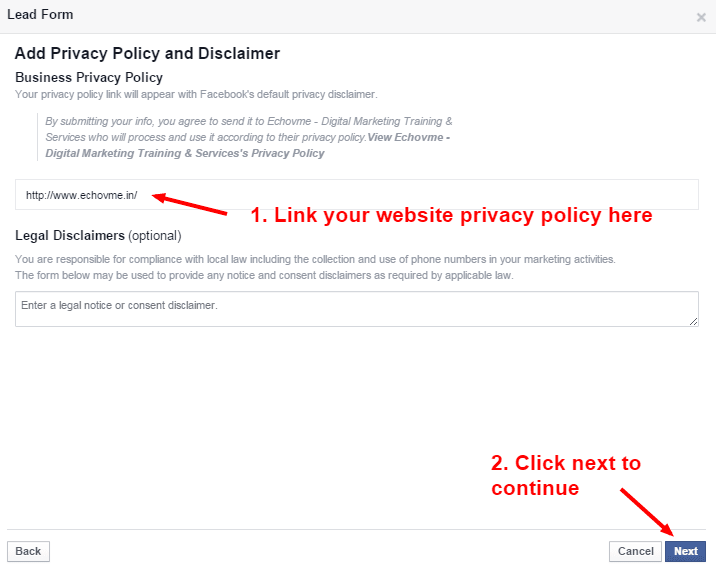
Third step: In this section you will be adding the link/URL of your website. Copy paste the privacy policy and click on Next to navigate further.

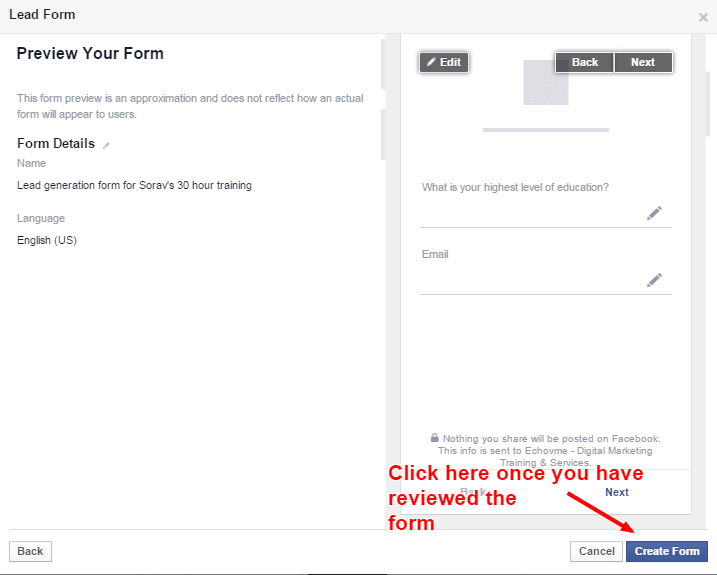
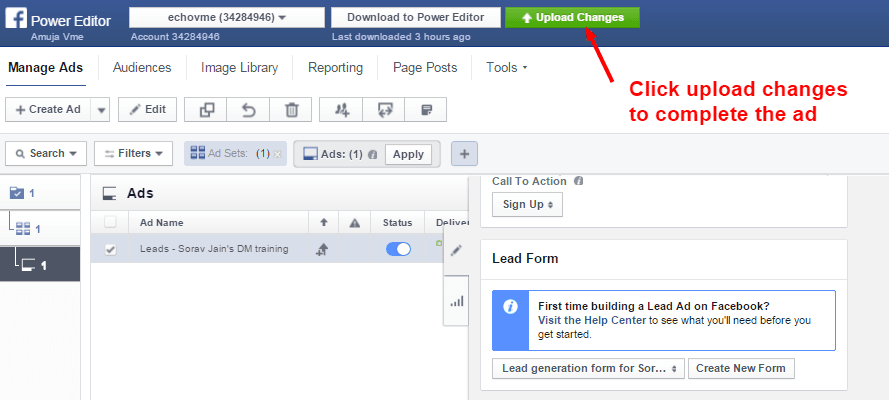
Step 6: Review your form to double check for any errors and then submit it. Click on upload changes to save the actions you have performed so far for your Ad.
How to Track the Leads Received – Step by step.
Now that we have created a lead generation Ad based on our requirements, it’s time to reap all the results. Wonder where your leads are going? There’s a simple way to check that. Leads are downloadable on Facebook in CSV format. We’ll tell you how to go about it too.
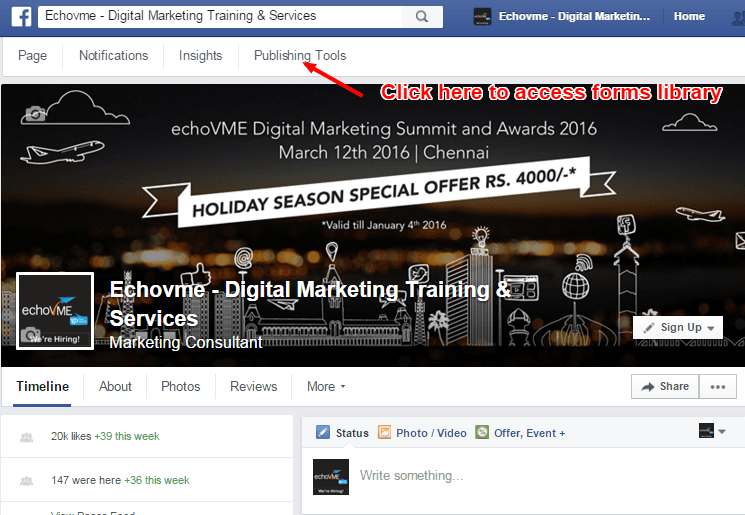
Step 1: All the leads are aggregated on Facebook which then has to be downloaded. Go to the Facebook page for which you created the lead generation Ad using the admin access. Click on publishing tool on the top of the page.
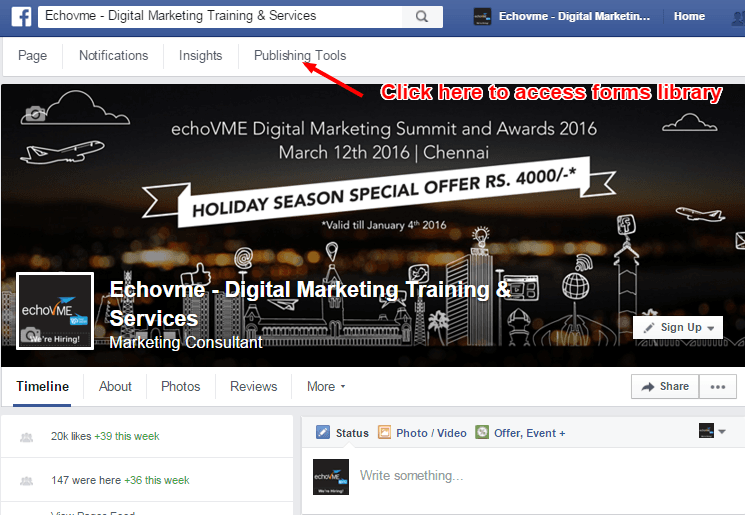
Step 2: Once you have clicked the publishing tools button you will be navigated to another page. Click the Forms library on the left hand side bottom. Click on your Ads download link and download the leads in CSV format.
The CSV sheet has columns with details of customers that you asked for.

*This is just a mock representation of the form & does not hold any meaningful value.
So there you have it! The step by step procedure for running Facebook Lead Generation Ads without having to use the pixel code. If you haven’t yet got the option for running these Ads, don’t fret. Facebook releases its features in phases. You shall receive it soon! Good luck J
It’s Your Turn Now!
As a part of our learning, I would like to learn from you your experience of Facebook Lead Generation Ads! This will give us some insights. Please use comment section below to share your feedback.
This article was contributed by Malavika – Social Media Manager and Kavya Shree – Social Media Strategist at echoVME under the guidance of Sorav Jain


