Spayee is one of the most affordable online course platforms in India. As a creator it can turn out to be a great alternative for Teachable or Thinkific if you want to create beautiful looking courses and build a white labeled app in the future.
In this Spayee Review, I will walk you through all the features that the platform boasts about and help you take an informed decision whether to use Spayee or not for your next online course.
| Type | Learning Management system |
|---|---|
| Starting price | 2999/month |
| Features |
|
| Competitors | Teachable, Thinkific |
Table of Contents
Whom is Spayee for?
If you are someone who wants to build an affiliate system for your course but don’t have the budget to spend on Teachable or Thinkific or you want to build white labeled apps and websites, then Spayee could be a good option for you. I have been testing out Spayee for a while and now, let me share my in-depth review with you.
Here’s everything you are going to learn about Spayee today:
- What I liked about Spayee?
- What I didn’t like about Spayee?
What I liked about Spayee?
- Simple UI & UX, Easy to Learn and Use
- Comes with Unlimited Courses, Students, Quizzes and Learners in all the plans.
- Spayee is one of the value for money platforms unlike Teachable & Thinkific which have very limited features in their cheaper plans.
- No transaction fees in any of the plans whereas Teachable charges 5% transaction fees, even in it’s premium plan.
- You can set-up affiliate programs with ease to allow your fans or students to make money by becoming your affiliate.
- Easy to Use No-Code, Drag and Drop Website Builder.
- Use all sorts of content formats (Video, Audio, PDF, Quiz, SCORM, Forms and Assignments) to make your course more engaging.
- Integrated Payment Gateways for seamless transactions
- You can use your custom domain to host your courses too.
- Build completely white-labeled native Android and IOS Apps.
What I didn’t like about Spayee?
- No free plan of sorts like Teachable or Thinkific.
- Spayee Lacks advanced marketing features like email marketing automation and building sales funnels.
Interface and Usability

Once you create an account with Spayee and login, you can see a screen where it shows you four options to work on. The dashboard page is fairly simple and easy to use. All the features are packed in it and accessible in the left side bar of the page as you can see in the screenshot.
The options in the first page are:
- Create your First Course: You can just upload the course material and order them in sequence.
- Customise the site: You can choose from the two free themes available and build your website or use their page builder for more customisations.
- Setup your custom domain name and remove spayee branding.
- Finally Launch your Own Course Platform
Although the UI is pretty self-explanatory and easy to use, Spayee has a very good customer service team and they help you with the onboarding process step by step so that you don’t face any difficulties.
In the left side bar, you have all the features promised in the landing page of Spayee accessible with just two clicks.


Let’s talk about the spayee features in brief
- Reports: Check the number of daily sales, bandwidth available, downloads and lots more in reports
- Content: Here you have access to all the content of the course under one tab like videos, pdfs, live sessions, question banks and tests.
- Users: Under users you can oversee all the Learners, Admins, Instructors, Affiliates and Subscribers
- Engagement: Engage with the learners, post updates and solve queries course wise.
- Design: In here you can customise your website and mobile apps easily.
- Marketing: You can publish your blogs, create promo codes and manage your affiliates and credit points.
- Integrations: Easily integrate with solutions like Google Analytics, Facebook Pixel, Vimeo, Zapier, SproutVideo, Email Integration and OTP Providers.
- Settings: You can access the domain settings, payment gateway details, configuration settings of videos, email settings and tax details.
I really liked the way Spayee has presented it’s features so that even a non-techie can understand with ease.
Course Creation
With all the theory out of the way let’s deep dive into creating your first course on Spayee, and it’s fairly simple. Here’s the step-by-step process:
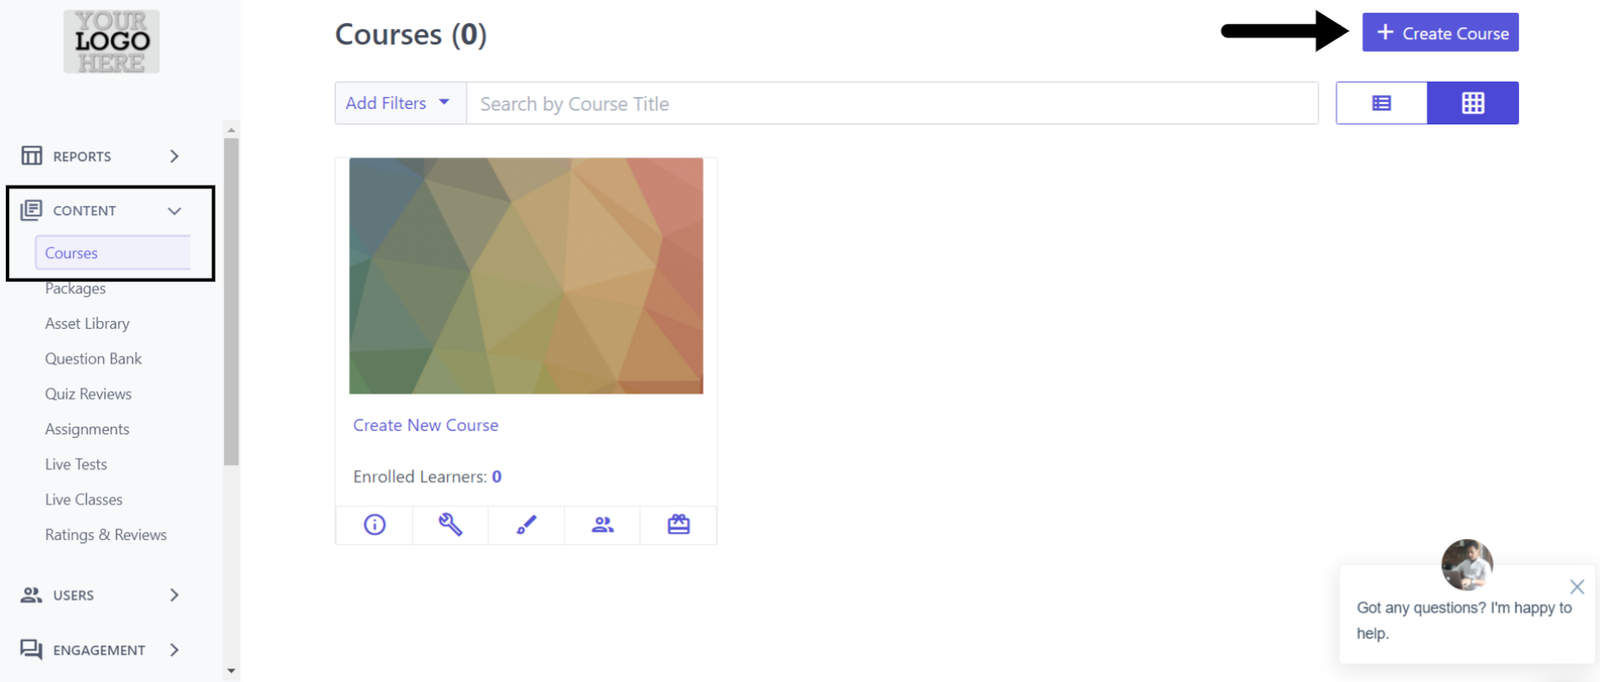
In order to create the course, click on “Content” in the left side bar and then go to “Courses”. In that page you will see an option of “Create Course” in the top right hand side of the page.
Once you click on “Create Course”, just fill out the basic information asked in the screenshot below and click on Submit.

In here, you choose between three types of course structures.
- Normal Course: Where you can keep adding new content every now and then and the content can be consumed by the learners without any barriers.
- Gamified Course: Here in, you can make the course items open only in a pre-defined order. You can add tests and quizzes and learners who pass can proceed to the next video. Here, the content can’t be updated after it’s published.
- SD Card Course: This works only in Android based devices and the content can’t be edited after it’s published.
In the next screen as shown in the screenshot below, you can start adding more information about the course so that your prospects can know what’s the curriculum of your course.
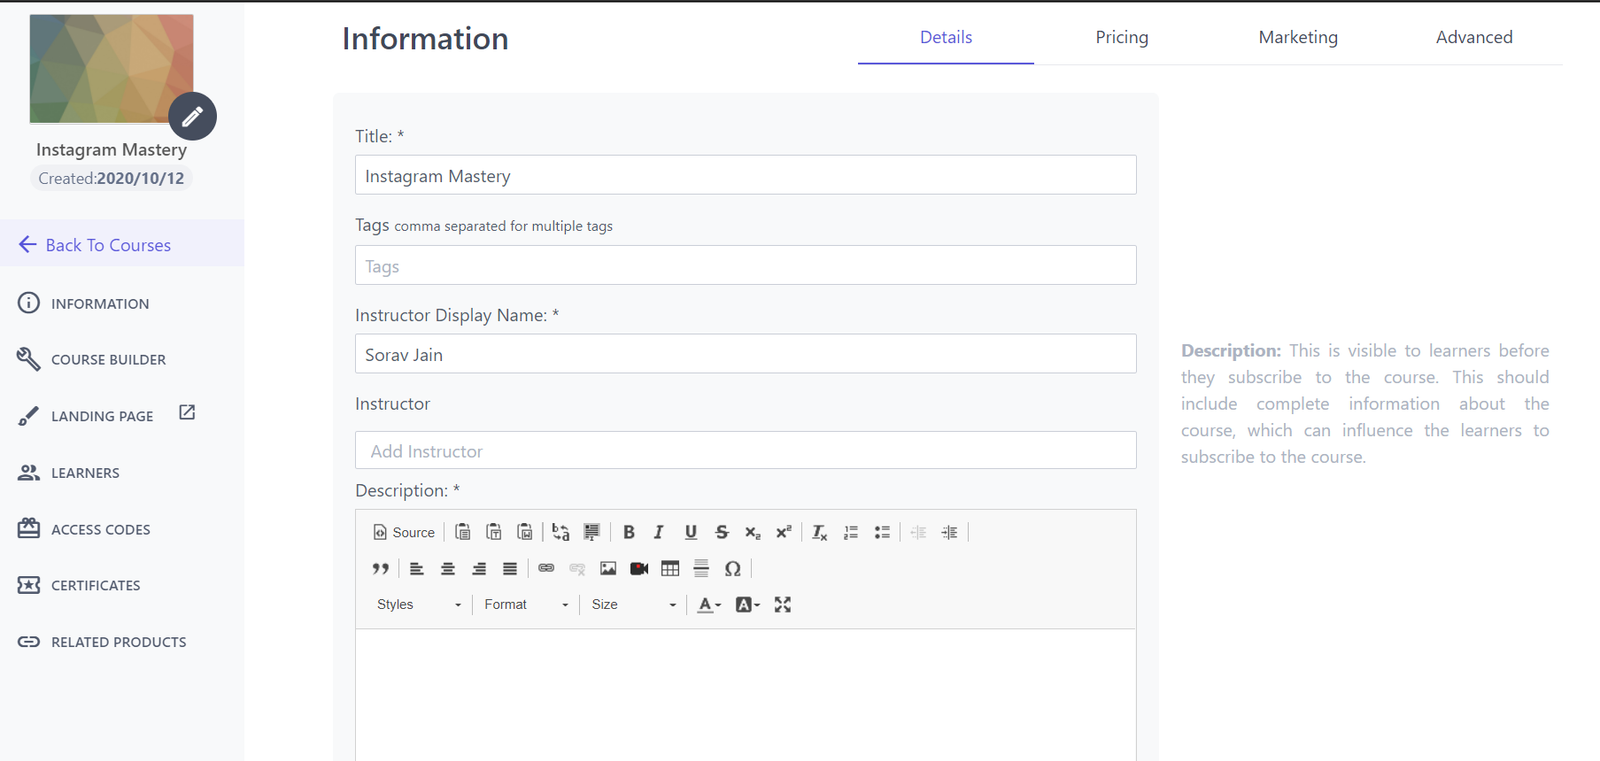
Now, after filling up the details, click on the “Course Builder” Option in the left side bar. In the next screen you can see all the options you need to start building your course from scratch.
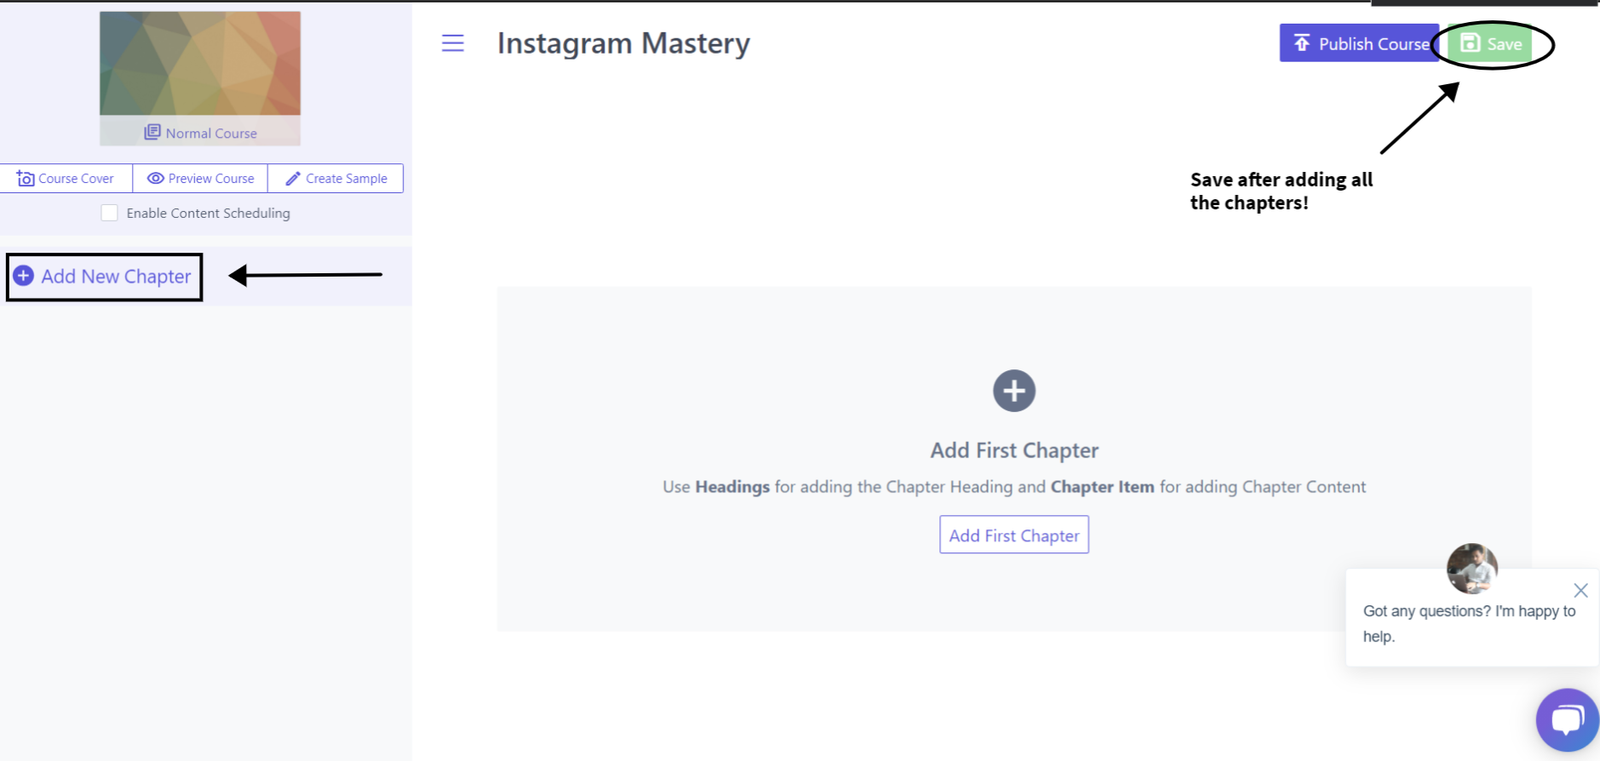
When you click on “Add New Chapter”, you can see a plethora of options to add.
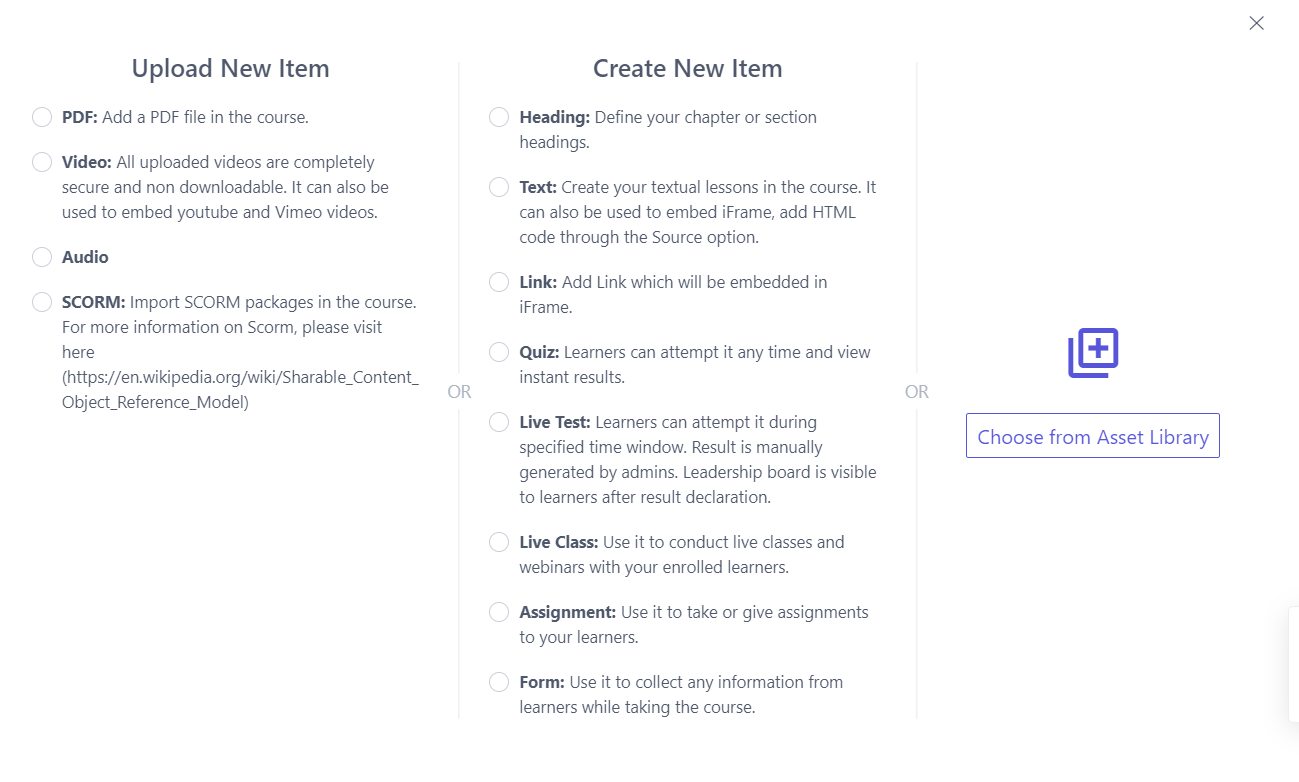
From here, it’s simple. Start adding the course content from the given options.
Start with the Headings of Each Chapter:

Upload the Course Content:
You can start uploading the video content of the course to the content in the order of the finalised curriculum of your course. All the videos are secured and not downloadable according to Spayee. You can also embed the videos by uploading them on Youtube or Vimeo.
Also add your pdf files and audio files of the course if any.
Add Text Based Content for your Course if necessary:

Create Quizzes to Test Learner’s Understanding:
It’s fairly simple. Just click on the “Quiz” Option in “Create New Item” Section and create a random quiz out of your own question bank to test the learner’s understanding of the concepts.

Spayee has robust features and you can customise your quizzes as per your needs. Choose the Number of Questions, Time to Complete the Test, Question Types and also Add Several Sections just with a click of a few buttons.
I personally feel quizzes are a great way to keep the students engaged in the course.
Setup and Schedule Live Tests:
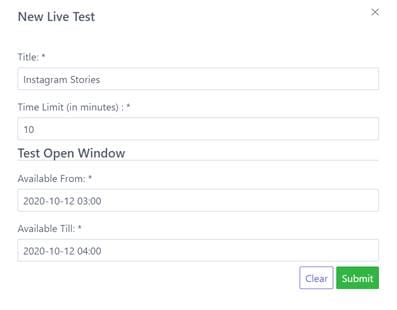
After you click on submit in the screenshot above, in the next screen you can start adding questions manually or through your previously uploaded question bank.

Build Forms and Take Assignments:
You can build forms to collect information or feedback. Just click on “Forms” and Add a Heading to it. In the next screen, start adding the fields from right to left and start adding your questions. Checkbox Group can be used for Multiple Choice Questions. Paragraph field can be used when you need an descriptive answer/reply/review from your learners.

Build Amazing Landing Pages:
Spayee has some amazing templates, which you can use to build some beautiful landing pages for your online course. After you have created the outline of your course and added all the video content, question banks and assignments you can now go back and click on “Landing Page” below Course Builder and the screen will look something like this (in the screenshot below)
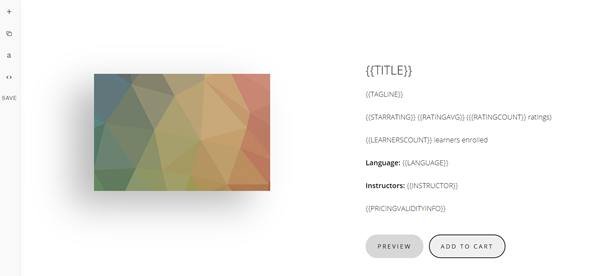
To customise the page click on the “+” button in the left side bar and you will see a tons of themes already available which you can use.

Now, Choose a Design which you find is nice and start adding your own content into it. It’s fairly simple just like I had said, a Drag and Drop Page Builder.

After you are done with editing the page and ordering the blocks, click on the “Save” Button in the left side bar.
Create and Issue Certificates:
One of the best features of Spayee is that it can issue certificates to the students seamlessly as per your needs. There is a default template that you can use to issue certificates to your students, although you can edit the design and conditions in the
“Certificates Section”

This is the default template of Certificate:

One more feature I would like to discuss in the certificates section is give out certificates based on the number of marks a student gets in the quizzes.

Exploring the Pricing of the Course:
In the Informations tab of the Course you built, you can easily edit the pricing variables and also build a cashback system which many big brands currently use to lure customers to buy their products even more.
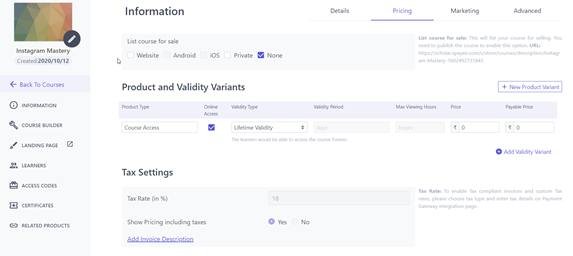
In the “Product and Validity Variants” Tab,
- You can choose whether you want to keep the course private or give online access.
- Also, you have the options of choosing the validity type of the course, i.e.
- Lifetime Validity: Choose this if you want to give Lifetime access to the course you are selling.
- Number of Days: You can choose this if you want to give access for only a limited number of days.
- Max Viewing Hours: This is a good validity type if you don’t want multiple people to use the same account to access the course. You can add a cap of 60 viewing hours for your 30 hour course. With this type a student can watch the course only twice.
- Fixed Date: In this type you can select a fixed date when the course validity ends.
Cashback and Coins System:
You might have seen a lot of ecommerce brands luring customers by selling them the idea of cashbacks. You can do the same too.
Under this, you can select the rules of Coins students can earn by buying your course.
- % of Course Payable Price: You can choose 5% the payable price. Let’s say you are selling a course priced at 1000 rupees. Then the students can earn 50 Coins and redeem them in their next purchase.
- Maximum Credits: Add a cap to the maximum credits, students can earn in coins by selling a course.
- Earned Credits Validity: Adding a validity to the credits earned by the students makes them spend their coins and not waste them. Although there is an option of having a lifetime validity.

User Management Simplified:
In just one tab, you can easily manage all the users i.e Learners, Admins, Instructors, Affiliates and Subscribers on your LMS.
To start, Just click on the “USERS” tab on the left side bar.

Engage and Connect with your Learners:
Cut the Whatsapp and Telegram Groups, Spayee allows all the users to connect through the Public Forum & Messenger Tab which are available in the LMS itself. So, it will reduce distractions in the students and help in healthy conversations and easy doubt clearing sessions.
You can find both the options in the “Engagement” tab.
Leverage Advanced Marketing Features:
You have built a beautiful course on Spayee. The content is amazing. But how will you sell more without a strong marketing strategy?
This is where the advanced marketing features of Spayee come to rescue.
Here are some of the best features:
I have already talked about the cashback mechanism and how you can use it to lure customers to buy more of your courses in the above sections.
Now, Let’s talk about the Refer and Earn System or Affiliate Marketing System and how it can slowly automate your sales process through your students.
Under the Marketing Tab, Click on the “Promo Codes” in the left sidebar.
Then click on “New” Button in the right side of the screen and create a new promo code.
(You can refer to the screenshot below)

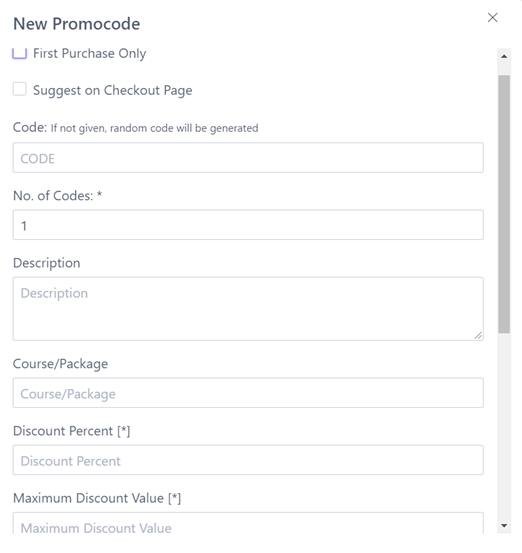
The Interface will look something like this when you add a new promocode.
- You can choose whether the promocode will be valid for first purchase only or a will it be suggested on the checkout page.
- Add the Description with the details of the promocode and the products on which the code is applicable.
- Also, select the discount percentage and maximum discount value of the promocodes.
- You also have the option of adding a minimum cart value, maximum use count of the code and validity.
Spayee Plans and Pricing:
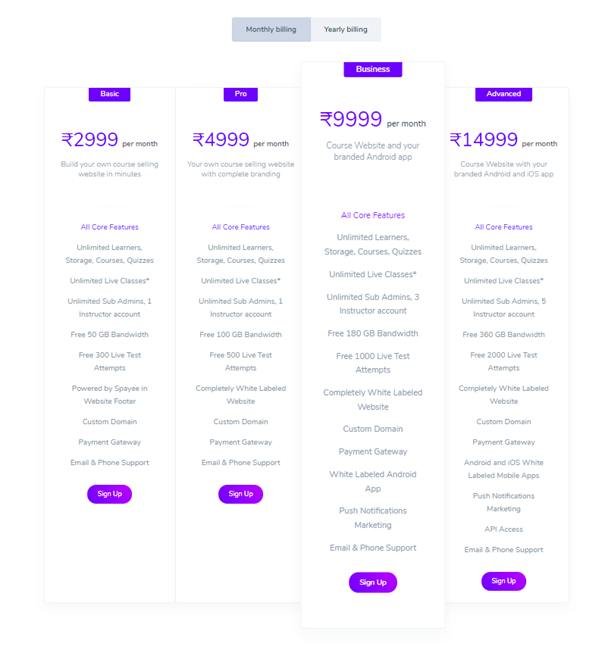
Checkout the Spayee Pricing Plans Here
If you look at the plans, these are the most affordable plans in the LMS market considering the plethora of features that Spayee is offering.
The lowest priced plan is the best one if you are just getting started. Although the only demerit of the plan is, it will show that the page is powered by Spayee. Although if you don’t want the Spayee branding and want a custom page built, then go for the PRO Plan and get a white labeled site. You can go for the higher plans if you need a white labeled Android and IOS App too.
What I love about the platform is that the core features are not taken away in the cheaper options. You have all the advanced marketing options like the Cashback Mechanism and Affiliate Marketing Tools which most LMS don’t offer at such a low price.
💓 Awesome bonuses from our side if you book Spayee from us:
✅ ClickFunnels – Two functional Share Funnels for Consulting and Agency owners worth 1997$
✅ Content Calendar For 60 Days for Social Media
✅ 25+ Professional Canva Templates
✅ 30+ High Engaging Captions for Your Social Media
✅ Complete Email Marketing Course ( Learn how to setup lead generation and create your ebook from scratch in less than 10 mins and learn how to get started with email marketing.
✅ 10+ Email Templates for you to get started immediately.
So go ahead, test as much as you want in the free trial and let us know at rishi@echovme.com once you’re ready for the next step
Yes, I want to Sign Up For Free & Get Bonuses
Conclusion: Should you go for Spayee?
If you are low on budget and want the advanced marketing features integrated with them, then Spayee is a great option. Teachable and Thinkific are great solutions too but the price of Spayee and the features it is providing is commendable, which makes it a tough deal to ignore.
I hope you loved the Spayee Review.


